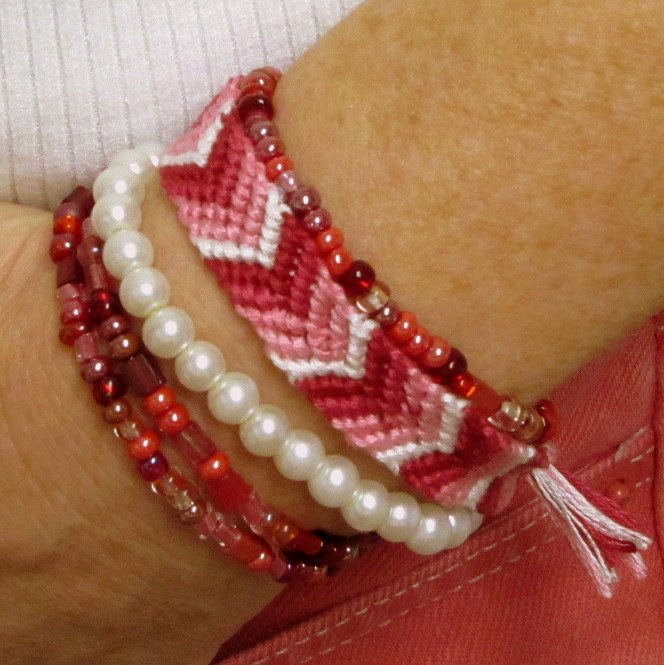
Today’s tutorial is my little Valentine’s gift for you. Friendship bracelets require minimal supplies and they are easy to make. Once you get the hang of the overhand knot used, you will be able to make your bracelets out of all sorts of materials, in a rainbow of colours. In honor of Saint Valentine’s Day, I’m making a bracelet in scrumptious shades of reds, pinks, and cream.
Some of you may remember me waxing poetic about summer camp in
this post. Many happy hours were spent at the craft tables escaping the heat of the early afternoons. What I haven’t yet shared, is that I also spent a summer employed as a summer day camp leader. So, I do have some experience in teaching the crafty things I learned. I am hopeful that those skills will come in handy as I attempt to share both written and visual instructions for making your own friendship bracelet.
Okay, let’s get started.
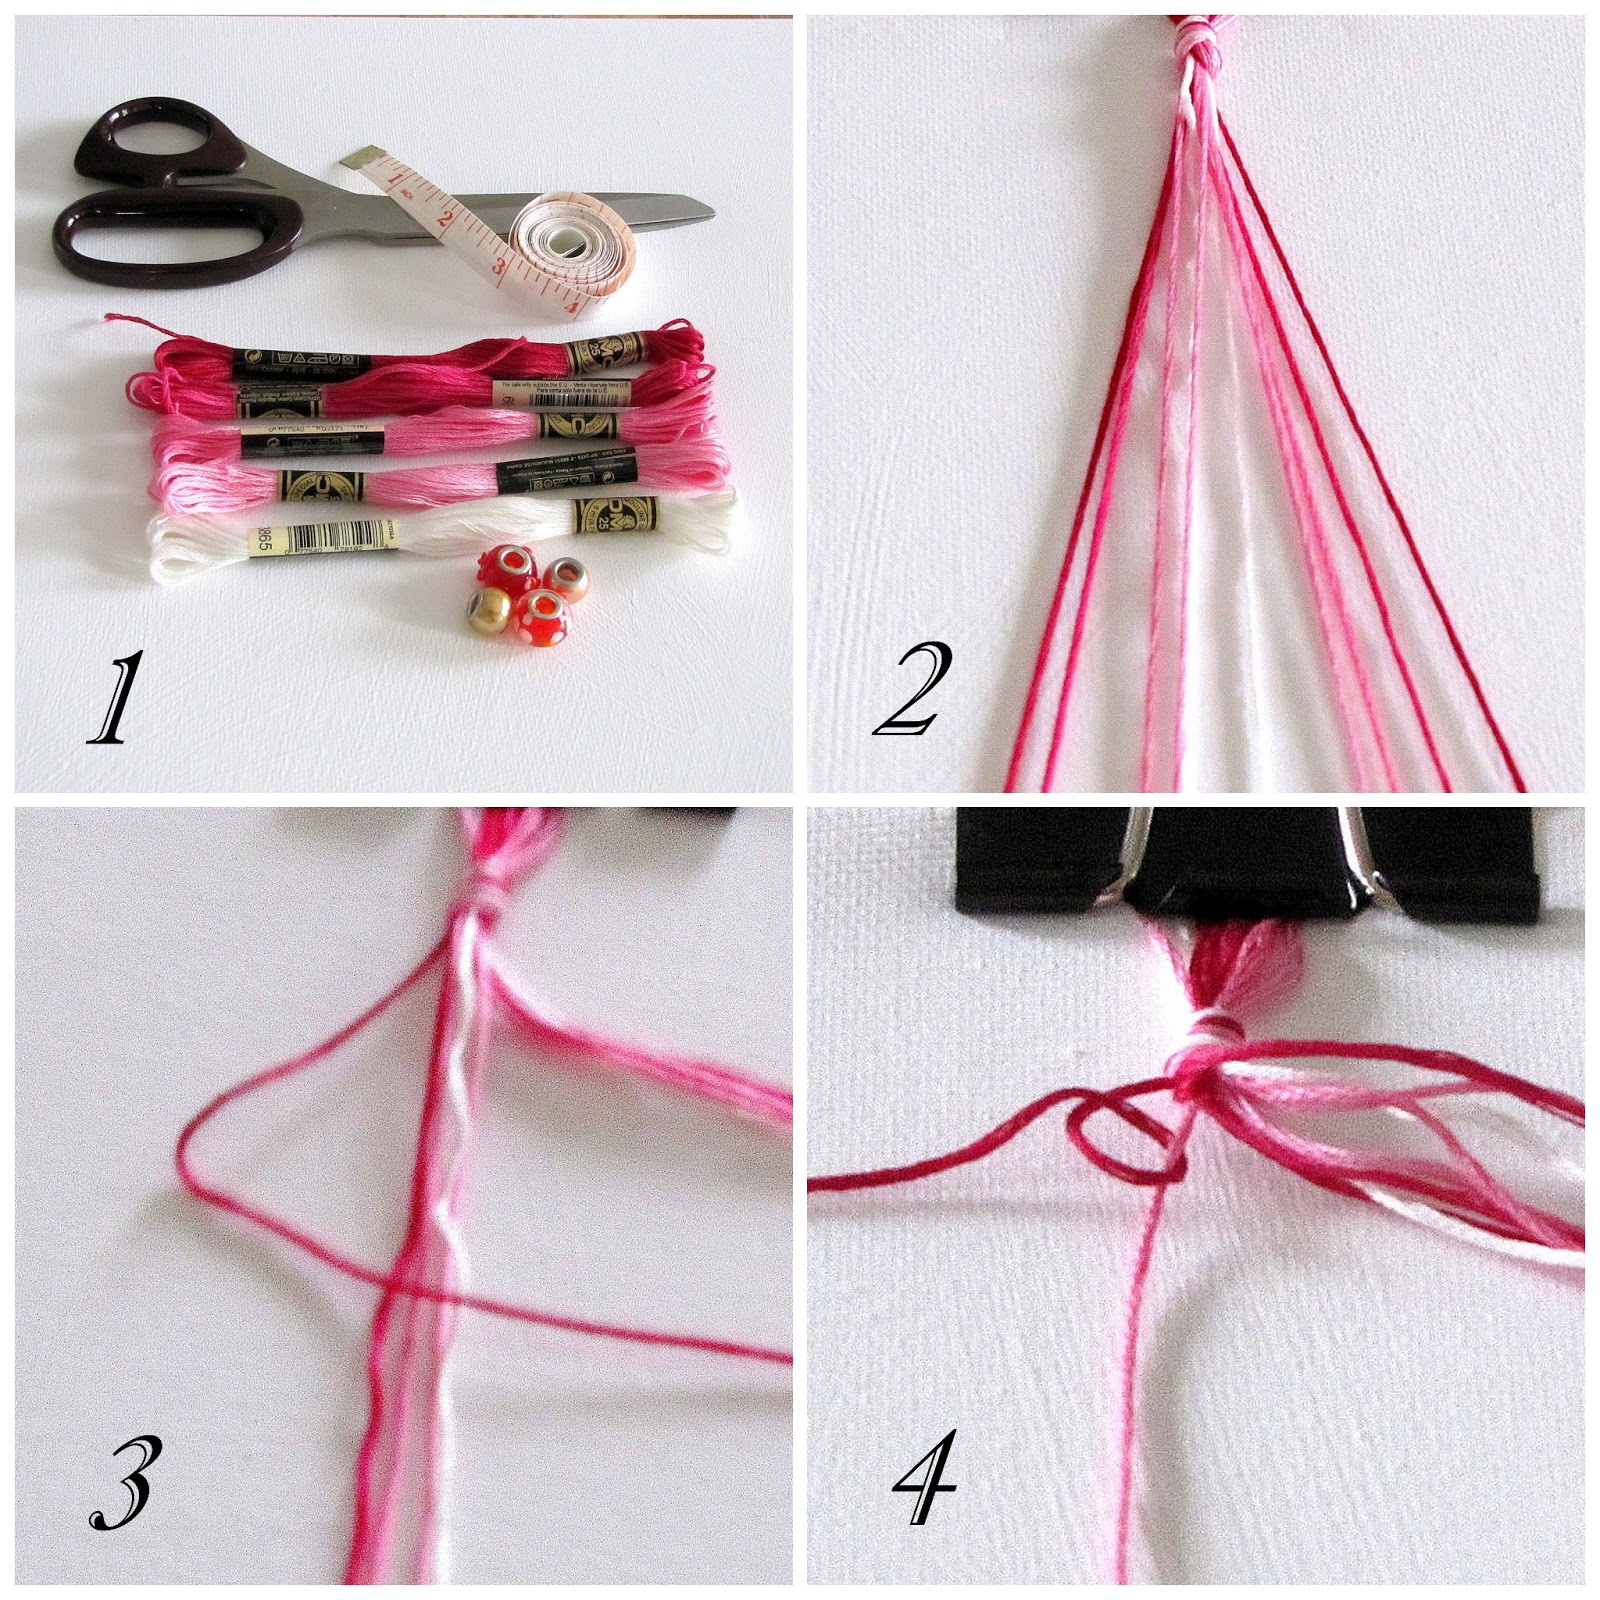
1. Supplies needed for this project are a selection of threads. I am using five different colours of embroidery thread. You will also need a pair of scissors, a tape measure, and a bead with a very large hole. I have more than one bead in my photo because I have not determined which one I ultimately want to use.
2. I am using a total of ten threads, five on each side of the chevron design. I am going for an ombre effect, and have shades varying from dark raspberry to cream. Cut each thread 30″ long. Gather them together and tie them in a single knot leaving about 3″ of fringe at the end. Clip or tape your bracelet to your work surface. A clipboard works well for this purpose. Now, it’s time to lay out your threads in colour order. You want the left half of your bracelet to be a mirror image of the right half. As you can see, my threads are arranged from the darkest raspberry shade on the outside left and outside right; then a lighter shade of raspberry second in from the left and second in from the right, continuing to the middle two cream threads.
3. The first step is making your first knot! Beginning with your thread that is on the far left side of your bracelet; bring it over the thread beside it and loop around and up and through the middle. That is your first knot. Gently snug this knot up to the top of your bracelet. Now, repeat this exact same step, on the same thread, making a second knot. Again, gently snug it up to the previous knot. Continue working towards the right using your original thread as the knotting thread. Remember to make two knots over each thread until you have completed the left hand side. Yeah! That’s half of your first row done. Let’s move over to the right side now. Using the thread on the far right side, double knot the thread to the left, and continue working, knotting each thread twice until you reach the middle. Below, is an illustration of working from right to left. I have knotted several rows and you can see how nice and flat the bracelet lies.
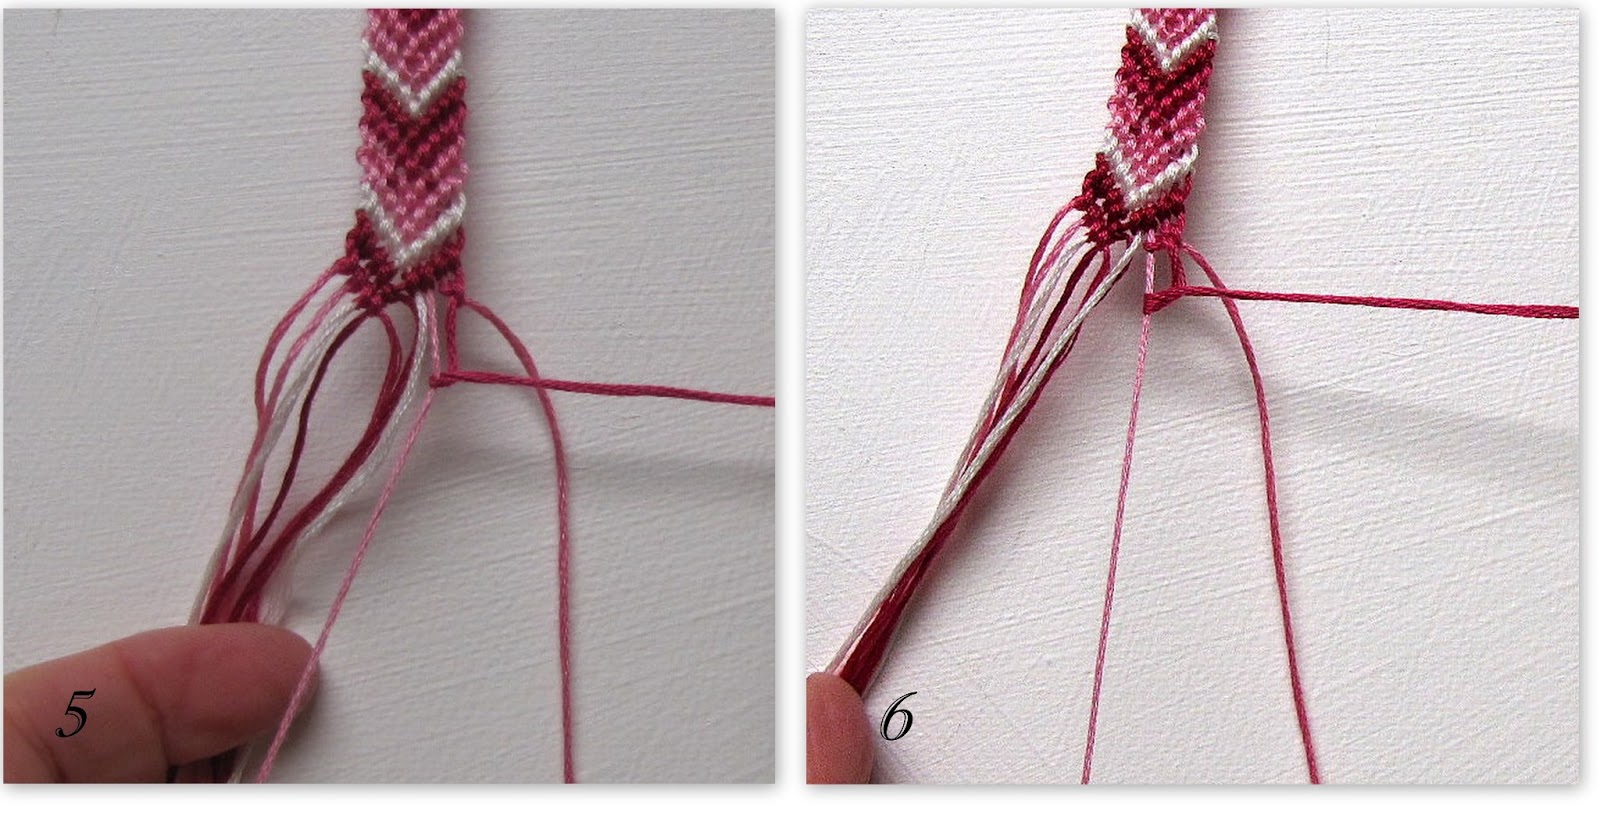
5. Photo #5 illustrates working from the right side towards the centre. The thread on the farthest right side is the knotting thread. Cross it over the thread to the left, loop it around and up through the middle. I anchor the static thread in my left hand, keeping the thread taut as I make the knot with my right hand.
6. Photo #6 illustrates the knot that I made in photo 5, and it also shows the second knot being made. Again, hold the thread that is being knotted firmly in one hand while making the knot with the other hand. Gently snug up the knots close to the row above.
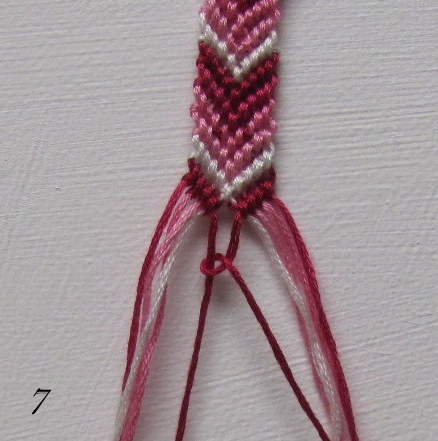
7. Okay, you have completed your left hand side row, and you have completed your right hand side row. It’s time to tie the centre knot. This photo illustrates just that. Tie a knot using the left hand knotting thread as the anchor thread. Your right hand knotting thread ties the knot. After securing the first knot, tie a second knot.
That’s it. Now go back to step 3. Your outside left thread is your knotting thread, and working in towards the centre, knot over each thread twice. Repeat from the right side. Knot the middle thread. The first couple of rows are the most difficult. The threads want to get a bit muddled up, but once you have two or three rows done, you will see the pattern and your project will move along fairly quickly.
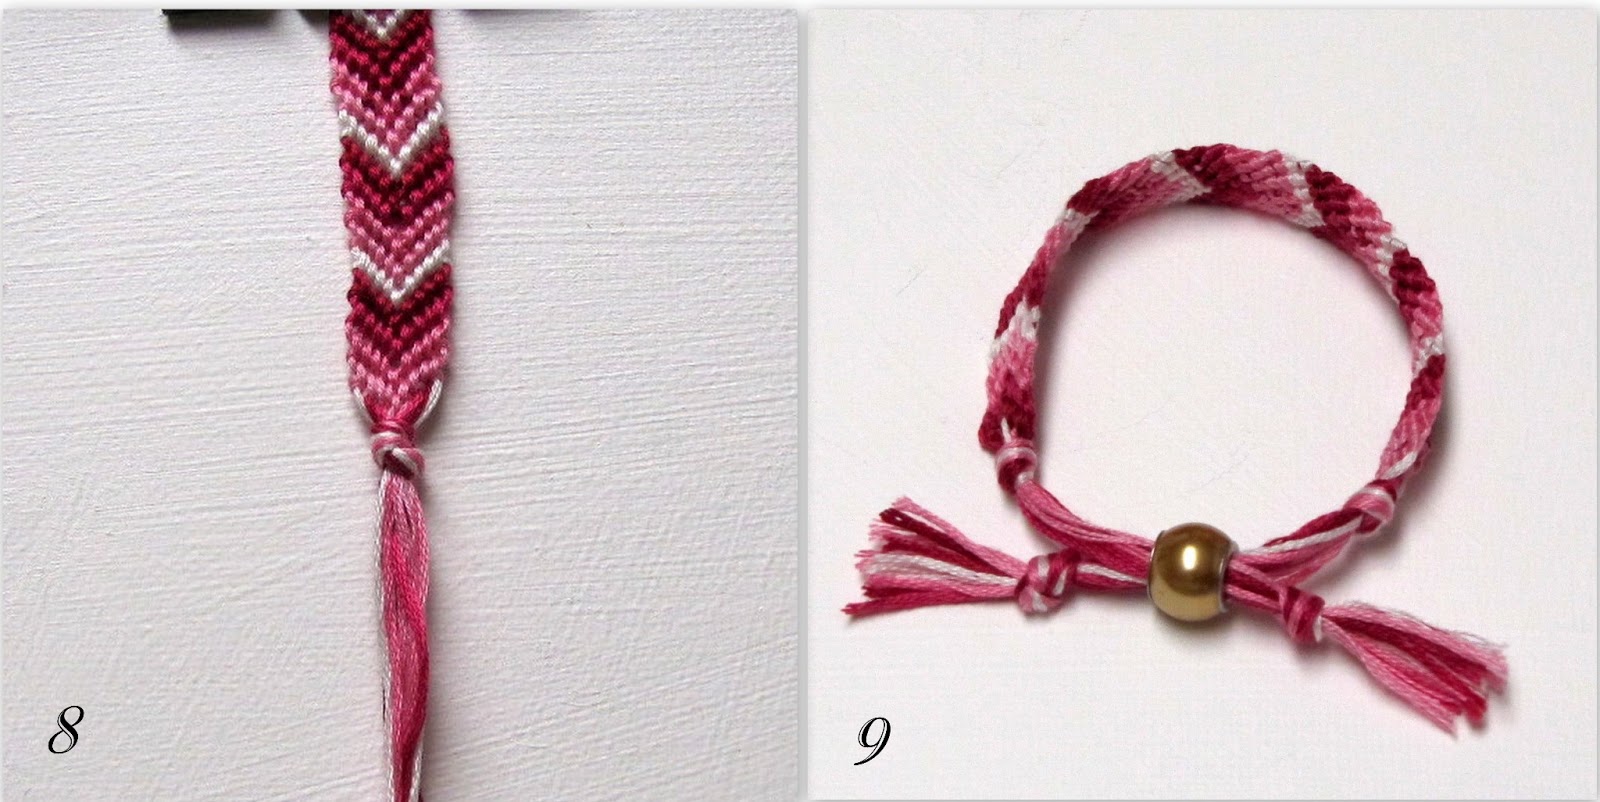
8. When your bracelet is almost the size of your wrist, tie a knot to secure your handiwork.
9. Thread all of your threads through the single bead, and knot the ends. Trim off any excess threads evenly. This simple closure allows the bracelet to be loosened to slip over you hand, and then snugged up over your wrist.
There you have it! A little arm candy for Valentine’s Day and any other day you feel like a little bling. I’ve stacked mine with some simple seed beads strung on elastic beading thread, and some faux pearls, also strung on elastic beading thread. Embroidery thread is an easy choice for friendship bracelets. There is an endless selection of colours to choose from. Embroidery thread is very soft, however; and your bracelet may have a tendency to curl slightly at the edges. Therefore, you may wish to experiment with some of the heavier knotting threads available.
Linking up with:
Clairejustineoxox for Creative Mondays
A Cat-Like Curiosity for Super Handmade Sundays
Faith Hope and Charity for Ta Da Tuesday
Jann at Have a Daily Cup of Mrs. Olson for Share Your Cup






26 Comments
Beautiful colours and artistry, Sue. Love it!
Happy Valentine's Day,
Shirl
Lovely diy. Interesting blog
I used to make these – what a blast from the past! I think mine always had a diagonal pattern rather than a chevron though. And they were never so neat as that, I just tied them in a knot. I'm going to have to give it another go, I have loads of embroidery thread.
Thanks for linking up!
How lovely! I was totally useless at these as a teenager!!! I tried but I've always had a problem with tying knots and bows. To this day, I can't tie a normal bow- I have to do bunny-ears bow!x
This looks like fun – so pretty!
Sue, I've nominated you for a Liebster Award! You can read about it on my latest post –
http://latebloomingsparkle.blogspot.com/2013/02/du-bist-mein-liebling.html
So much fun! Thank you for sharing with us, I had a group of girls over today and they all took home a bracelet because of you. So glad I found your blog.
Thanks Shirl. Happy Valentine's Day to you too!
Thanks for visiting Natasha!
If you have threads on hand, there's nothing stopping you. Have fun! Thanks for hosting the linky party.
Bunny ear bows are so cute!
{Blush} Thank you so much Val. I will pop over tomorrow and have a look at the probing questions that I get to answer. Congrats to you!
Trina, that is so wonderful to hear! I am so pleased that you not only read my blog, but that you had fun doing a little DIY project.
Very nice! I love these bracelets.
Gorgeous! And really clear instructions. I'm definitely going to give it a go! x
You are crafty! And very well illustrated and written
Thank you i might try one day if i have the patience
Ah oui! My friend wanting to tell you, if you ever come to Mtl i will take you to Renaissance ok?
Ariane xxxx
This post seriously takes me back to 7th grade. I had a pretty successful business amongst my classmates making these bad boys. Those were the days…..
Ginny
mynewfavoriteoutfit.blogspot.com
This just brought back memories of my childhood. Oh how I used to love making these! I'm going to teach my daughters how to now. Thanks for the reminder.
Your photos & details of these bracelets are beautiful! Love the chevron design & colours you chose.
Denise
This is gorgeous – such a thoughtful gift for a friend. And your photographs are great.
Thanks so much for linking up 🙂
Sarah @ A Cat-Like Curiosity
So cute Sue. My youngest daughter use to make these but I had forgot how. Thanks for sharing this fun tutorial with Share Your Cup.
hugs,
Jann
Thanks for all your comments. I appreciate your popping by and taking the time!
Beautiful, love the colours and the detail in them. You did a great job here 🙂 thanks for linking up to Creative Mondays …
That is cool.
bisous
Suzanne
This comment has been removed by a blog administrator.
[…] Download Image More @ http://www.acolourfulcanvas.com […]
[…] Beste Bracelet Diy von DIY Friendship Bracelet. Quellbild: http://www.acolourfulcanvas.com. Besuchen Sie diese Site für Details: http://www.acolourfulcanvas.com […]