
Insulated Kelly Anorak : : March Sew Your Wardrobe Basics : : Closet Case Patterns
Hallo. Hallo.
Friends, before jumping into today’s blog, I want to give you a heads up that this is an everyday kinda post…in other words, my usual rambling chat with goofy photos. I know. It’s not an everyday kind of world right now…and I’m not without anxiety. But…for me…sewing, and blogging, and staying connected with the sewing community is both a comfort and a distraction. So, without further adieu…on today’s menu…virtual hugs with a side of sewing chat…
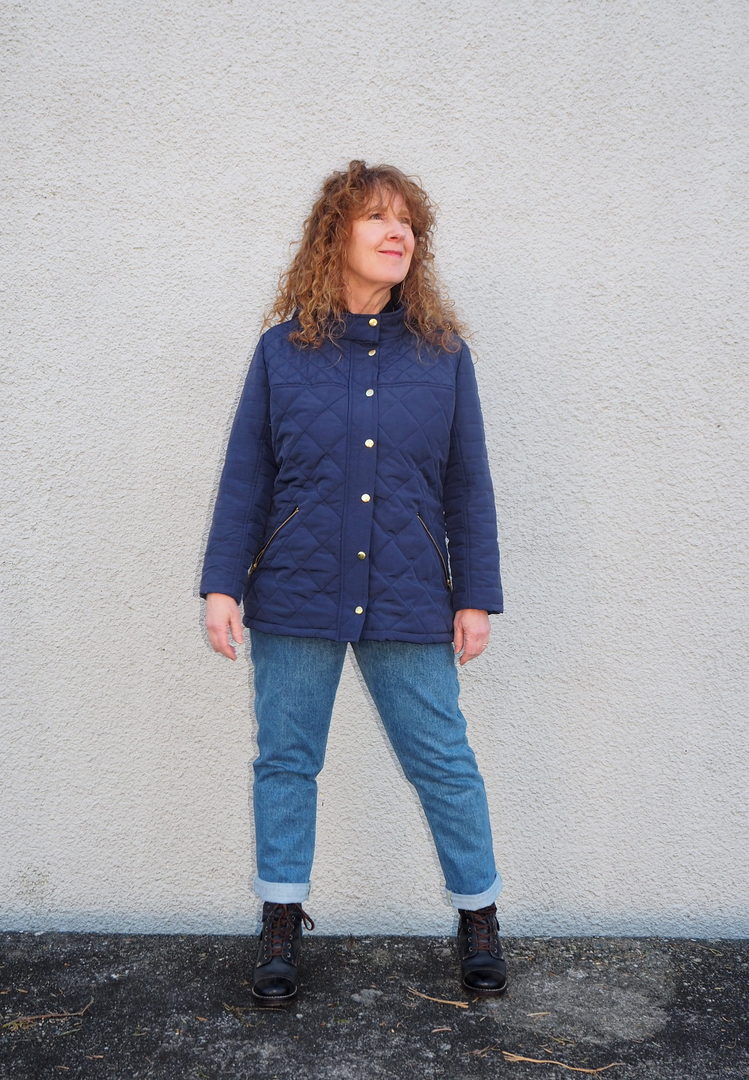
Even though it’s officially spring in a couple of days, today’s blog post is about my recently completed warm and toasty Kelly Anorak.
I’m sharing all the details…perhaps too much information…but I need to do this. For myself. This make taught me a ton of new stuff and having the information documented might come in handy in the future.
First. Let me take you back…way back to last October when I wrote this :
“Another big plus about this season is that, for me, it’s prime me-made coat season. I prefer sewing/wearing light to medium weight fabrications….my me-made coats are never super insulating. They’re cozy, but not usually cozy enough for winter cold.”
After I wrote that, I started thinking….what if….what if I made a winter coat that was insulating but still light weight? Could I? Should I? Well, yes I could and yes I should, and yes I did.
Funny thing….the journey from the ‘yes I could’ point to the ‘yes I did’ point turned out to be a much bigger challenge than I anticipated. I bumbled, and I stumbled, right from the onset of the project….fabric selection…to the finishing touches….snaps. It was a bumpy ride, but I hung on until the bitter end. Yep….I’m a bit in awe that after all we’ve been through, I still LOVE you jacket. Not bitter. At. All. I almost can’t remember wadding up your lining and throwing it in the corner, the endless unpicking of stitches, the broken needles, and…most of all…the massive testing of my patience.
Ch-Ch-Cha-Changes

I knew going in that this was going to be an investment project. Fabrics and hardware weren’t going to be cheap. It made sense to sew a pattern I had sewn before. The Kelly Anorak….you can see my first one here…was really close to what I wanted so I went with it, sizing up one size to allow for the added bulk that comes with an insulated jacket.
I made the lined version of View B with a few changes. I drafted the front placket 1/4″ narrower and the right top zipper facing 1/2″ narrower…the intention being to minimize bulk in the front zipper area. It was harrowing constructing the placket and inserting the zipper….I totally doubted my math skills and I was afraid I’d screw up everything from the neckline right down to the hem. I basted every step of the way and I was so relieved when it all came together. The collar is 1/2″ lower in height than the drafted collar….which made for an unexpected change during construction…I couldn’t sew the collar and facing together using the partial burrito method that are in the instructions. I ended up hand sewing the collar facing to the collar…another make it work moment.

I switched out the gusseted pockets for inset zippered pockets. I kept the angle of the pocket opening the same as the original pockets.

I omitted both the back yoke and the drawstring at the waist. Instead, I shaped the garment at the side seams and added a waistband on the jacket back. And…perhaps my most loved feature…I added a detachable zippered hood.
The All Important Fabric Choices

I wanted lightweight fabrics with wind resistance and some water repellent properties. I mean, I was serious about this jacket performing as well, or better, than my RTW puffy jackets. After copious amounts of online homework, I chose the following:
Outer shell: Supplex/Taslan 70 dernier 100% nylon fabric. This fabrication has the durability of nylon and the soft hand finish of cotton. It has a durable water repellent (DWR) finish. The high thread count makes the fabric windproof yet breathable. Purchased from Quest Outfitters. Quest Outfitters provided me with samples of their fabrics for a nominal fee. The customer service was very high and I would purchase from them again.
Insulation: What a rabbit hole this turned out to be. I wanted an insulation that was highly rated but….da-da-da-dum….lightweight. The two options that kept popping up were Primaloft Gold and Climashield. I settled on 3 oz Primaloft Gold from Riptstop by the Roll. Service was very good, they were quick to respond to my questions. One thing though….I never quite grasped exactly how insulating Primaloft or Climashield would be. I was looking for a chart: ie, one layer of 30z Primaloft Gold is rated for an average of X degrees celsius. After my purchase, I did unexpectedly find a chart on Quest Outfitter’s site that, while confusing (I think it was for sleeping bags), listed six ounces total for a protection to -1C/30F. Ermmm…not the insulation I was expecting. Luckily, I had just enough of the three ounce to do two layers for the body of the jacket and a single layer for the sleeves. To date, my jacket has been warm enough…and we’ve had a few cold below zero evenings…but, I’m thinking 6 oz in future. Hahahaha…I keep talking like I’m going to make another. On the good news front, Primaloft Gold is feather light and surprisingly easy to work with. When I was quilting the fabric, I sewed it with fabric down towards the machine plate and didn’t have any jamming up or other problems.
Lining: I used 1.1 oz Ripstop Nylon, also from Ripstop By The Roll. It’s breathable, has a DWR finish and is a literal nightmare to sew….imagine trying to sew saran wrap. I’ve since read that the 1.6 oz HyperD, custom developed for RBTR, is fantastic to work with. (Ultimately, my walking foot was not the solution. A long stitch length and slow sewing on my regular machine was the ticket to success.) Note to self: buy the HyperD next time.
Needles: All points of construction, with the exception of inserting the main separating zipper: Schmetz Microtex (Sharp) Needles, 70/10. Zipper: Schmetz Universal 80/12
Construction: Quilting the Primaloft to the Shell
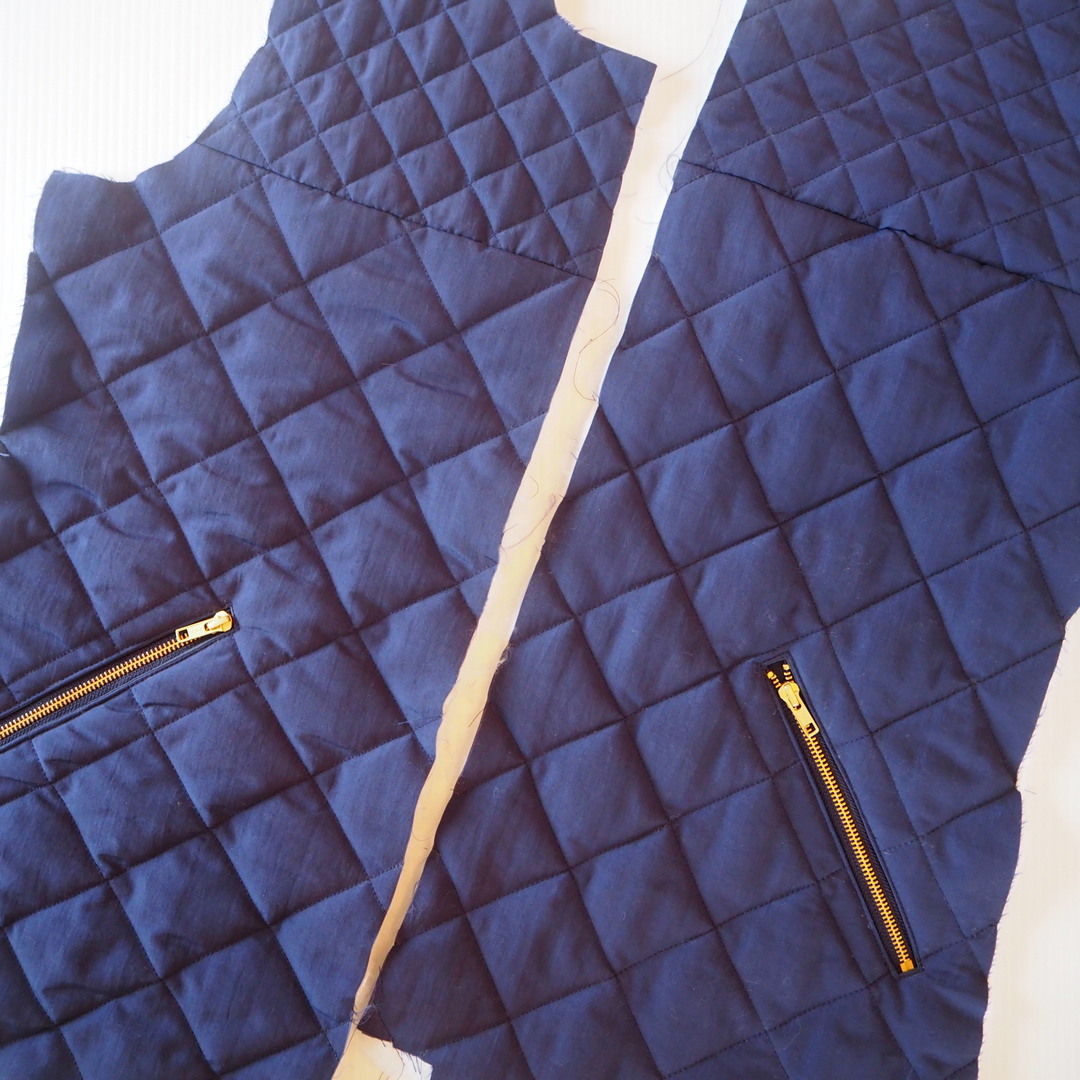
After I had my fabric selected, purchased, and in my hot little hands, the real work started….quilting the Primaloft to the Supplex outer shell. Quilting the fabrics together en masse wasn’t an option. I wanted different quilt patterns on different parts of my jacket plus I also knew that it would be next to impossible to machine quilt a couple of meters of fabric, with insulation, on my small machine.
The quilting experience did not get off to a good start. I wanted to eke out two layers from 2 yards of Primaloft, so I had to cut everything out singly. Fun that was. After cutting my outer pattern pieces, I laid them on the insulation, cutting the insulation slightly larger than the outer fabric. Why? No…I’m asking…why would I do that? I have no idea. Anyways, I hand basted the shell and PL together and started to quilt only to get major fabric bunching. It was not pretty. After trying several different stitch lengths, tissue on the underside, walking foot versus no walking foot, I felt slightly panicked. In desperation I removed the basting and…..TA DA….everybody was happy. Shell fabric, Primaloft, stitches. It was all good…until it wasn’t. My quilted pieces had shrunk. (Insert head smack here.) I had allowed for extra insulation but didn’t take into consideration that my outer fabric pieces would also shrink up from the quilting. Given that I had cut out all my fabric, I carried on, slightly anxious that my finished jacket was going to be too small. It wasn’t until the jacket was almost finished that I could do a fitting….and oh happy days…..the dang thing fit without alterations! Also fortunate, I can wear a sweater as a layer if I choose.
The sleeves are quilted with horizontal rows of stitching. The main body is quilted with a 2 3/8″ grid. The front yoke, back waistband, collar and hood are quilted with a 1 1/4″ grid. It’s difficult to see but the front placket has a groovy triangular design that matches up with the snaps.
The end result of the quilting looks awesome. However…always something…I am getting some ‘spotting’. The odd tiny bit of insulation poking through. It seems to be at points where there is fabric friction…under the arms for example. It isn’t a lot. But I didn’t anticipate any. In future, I will look more closely at down-proof rated outer shell fabric.
Detachable Zippered Hood

I really like the detachable hood option found on many ready-to-wear jackets. I’ve seen versions with snaps, buttons, velcro and…my personal favourite….zippers!
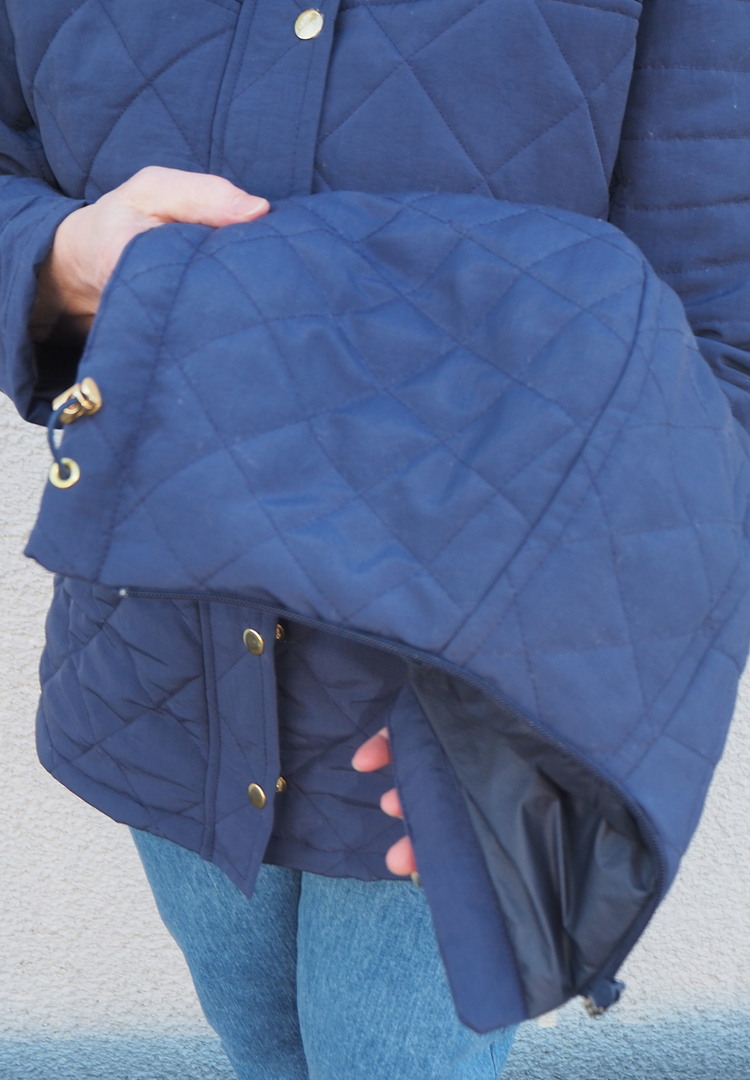
Please refer to this post to see how I made my detachable hood.
The….yawning….I mean lining

Okay. The innards are boring, but the fact is technical fabrics mainly come in solids…unless camo is your thing. I opted for the navy colour way primarily because if I was going to be putting a large amount of time and…in hindsight, effort…into this project, I wanted to maximize the wearability. Navy is my neutral.
I found the 1.1 oz Ripstop so hard to work with. I really did ball that sucker up and give it my best toss. I also unpicked the entire thing and re-stitched it. Note to future me….sew the lining with a long straight stitch, not your serger! After the fiasco was resolved I didn’t dare attempt an inside pocket (a feature I quite like in my ready-to-wear jackets).
While pinteresting* for my jacket, I found all the ideas! It’s easy for me to add too much and it took me some will power to edit my jacket down to a limited number of design features. For a finishing bit ‘o bling, I opted for shiny gold…zippers, hood hardware, and snaps (main separating zipper excluded). The spring snaps are from Goldstar Tool, here, and I’m happy to say that installation was a non-drama event. Hang on though…with this jacket it’s never a piece of cake. Immediately after setting them, one of the bottom snaps popped off. I was able to set another on right away but I’m a bit suspicious of it happening again.
*Pinteresting as defined by me – the act of trolling Pinterest for ideas.
This month’s theme for #sewyourwardrobebasics is Transitional Jackets. You can check out the inspiration over at Sea of Teal. February was stripes….one hundred percent basic…but unfortunately I had other things on the go and couldn’t participate.
Please visit Sea of Teal’s Link Up Party!
Sew Your Wardrobe Basics March
Wearing:
Kelly Anorak : : Closet Case Patterns My first version seen here
Morgan Boyfriend Jeans : : Closet Case Patterns Also seen here
Rise Turtleneck : : Papercut Patterns Also seen here


11 Comments
Your jacket looks amazing and thank you so much for the detailed information and plan to “pin” this for future reference.
Thank you so much Sharon. I had moments where I was quite certain I would never again attempt this kind of jacket….but I learned so much during the process that I truly think my next make will go easier!
This has been a huge effort. You changed so much, adjusted so much (love the belt at the back). The tough job of quilting, the sewing and unpickingof stitches… sooo much work. I am so glad you still like the jacket. Working on an item for so long was the reason I gave up sewing all toghether. After being occupied with making a skirt for 24 working hours, I was totally fed up with the end result. Bored to tears with it. The fact that you always see your own little flaws in the piece of clothing didn’t help. And the fact it didn’t always suit me when it was finished was the final straw.
You on the other hand, persisted and the jacket is so good. In length, in cut, in usefulness, in all the details you mentioned which you don’t spot immediately but would if they weren’t so darned perfect.
A job well done and I hope this jacket will give you joy for a very long time.
Greetje
PS love your long hair
Hey Greetje!
Thanks so much for the accolades! I definitely had moments where I thought, ‘What if I hate this?’ and ‘What if it doesn’t fit me?’ I was fairly confident about it suiting me because I had made it before…and I improved on the suitability with my little changes. It’s funny…I really can’t imagine my younger self persevering. But age has mellowed me, LOL…and I mostly enjoy the process of figuring things out. Maybe it’s partly because my needs are less now? I don’t know.
My long hair is fun, but can also be frustrating. I feel I have only one good hair day and then my curls get smooshed from sleep. I’m also think I’m getting more hair loss than when I was younger….I can’t decide if shorter hair would give the illusion of healthier, fuller hair or not?
Sue xo
You don’t lose more hair, there is just more of it because it is longer. I think you should investigate what kind of gel/moist/cream.. whatever… you can put in your hair after you slept on it. There are more curlyheads like you who have found a remedy.
Greetje
I’m going to play with spritzing my hair in the am and adding some product. for volume.. My stylist hasn’t sounded the alarm on hair loss, so you’re right…it’s the length of the hairs that come out that make it seem like more….plus they get tangled around my fingers. Short hair doesn’t do that….just goes down the drain. 🙂
Dear Sue,
I absolutely adore your jacket. The fit is great, the fabric is perfect! Your did such a great job! Especially the quilting!!! I can’t beliefe you did all this, it would take me month and month to finish this! 🙂 You put so much love in this jacket and I hope it will last you a long time!
Thank you for again joining #SewYourWardrobeBasics and supporting my sewing challenge!
I hope you are well and safe!
Greetings from Germany,
Stef
Dear Stef,
Thank YOU for hosting the challenge. I know current events were not anticipated when you initiated #SewYourWardrobeBasics…but sewing and following along with others has been a lovely distraction.
You stay safe too!
Sue xox
Impeccable! You made a lot of changes that it doesn’t even look like the original, great job!! Also great job on the placket width changes, was thinking I would do the same, but then I realized I would have to change multiple pieces including the collar. Glad it worked out.
Thank you so much Michelle! I think one thing that gave me the confidence moving forward on the changes for this make is that I have another Kelly Anorak. I find it helpful in being able to look at a finished make when I’m trying to figure out tweaks.
PS…this jacket has got a ton of wear. I almost always reach for it first during autumn and winter!
[…] here to my hood tutorial…was delivered to some subscribers. Oops…my bad. Please click here to see all the details on my Insulated Kelly […]