

DIY : : FABRIC LANYARD TUTORIAL
Hi you! I recently made a lot of fabric lanyards for our 40 + Blogger Meet-Up 2015, and thought I’d share a little DIY tutorial. These lanyards are handy to have around…the house and your neck…bwaaahahahaha. I bet they’re pretty awesome for kids too!* Great for ID and badge collecting…and….you can make them right sized for your pint sized! Of course, my very favourite thing about them is that they are lightweight…oh, and that they go with all my outfits. Yeppers…they don’t require much fabric at all; almost every one I made for the meet-up came from my scraps stash. You need as little as a 3″ wide strip of fabric! After stitching about five of them, I was in over-achiever euphoria. You know…the I can do anything frame of mind. After fifteen, I had the system down pat and was in full on assembly mode. After thirty? I wasn’t sure I ever wanted to see, let alone sew, another fabric lanyard again, LOL. But, it was all for fun, and fun for all.
*EDIT: It has been mentioned in the comments section that lanyards should come with a safety breakaway point. The addition of a plastic pull-apart connection will alter the construction method, but what a great feature to have…particularly if you are making one for a child. Unfortunately, none of my ready-made lanyards have a breakaway point, so I was unaware of this feature. A quick google search has confirmed that safety breakaway parts are readily available online.
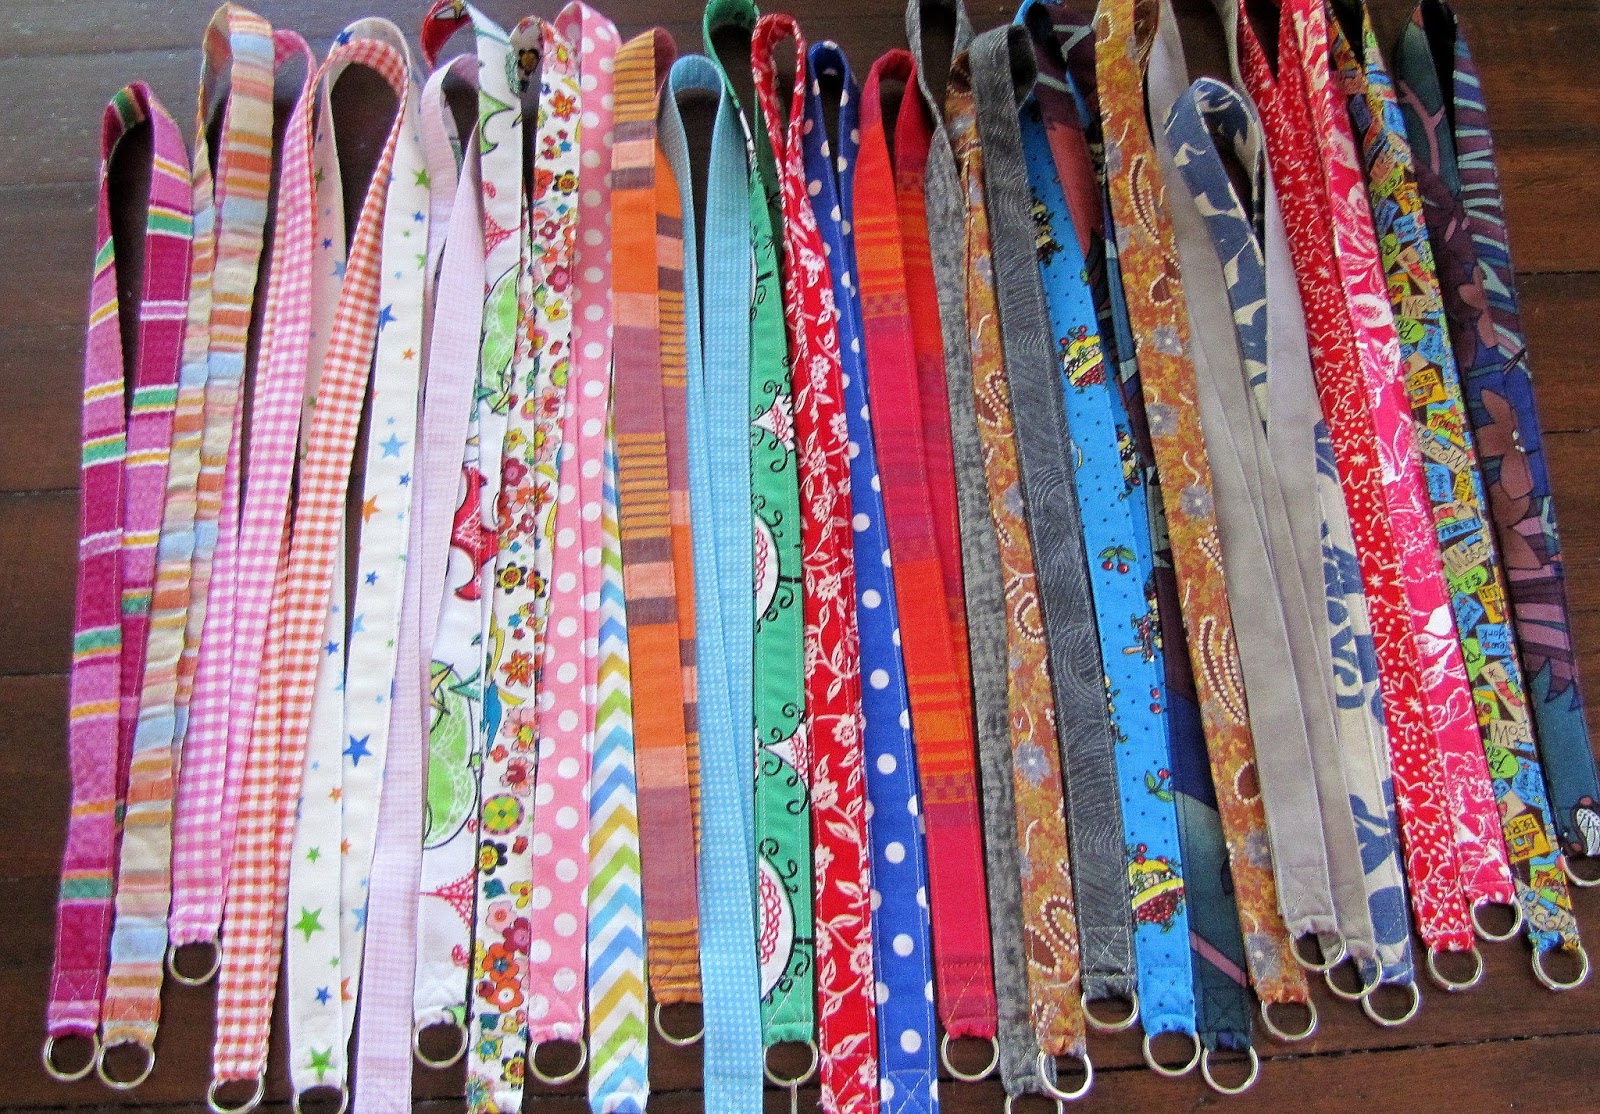
Okey dokey…you can make your lanyard any ‘ol size you want. You can see by the photograph above, that mine are of differing lengths. But, to give you a helping hand, just measure from the back of your neck to a spot somewhere around your belly button where you want your lanyard to end…now double that number and add 1″. For example, if you want your lanyard to hang 18″, cut your strip of fabric 37″ long. For a 3/4″ wide lanyard, as all mine are, cut your fabric 3″ wide! Now, let’s get at ‘er…


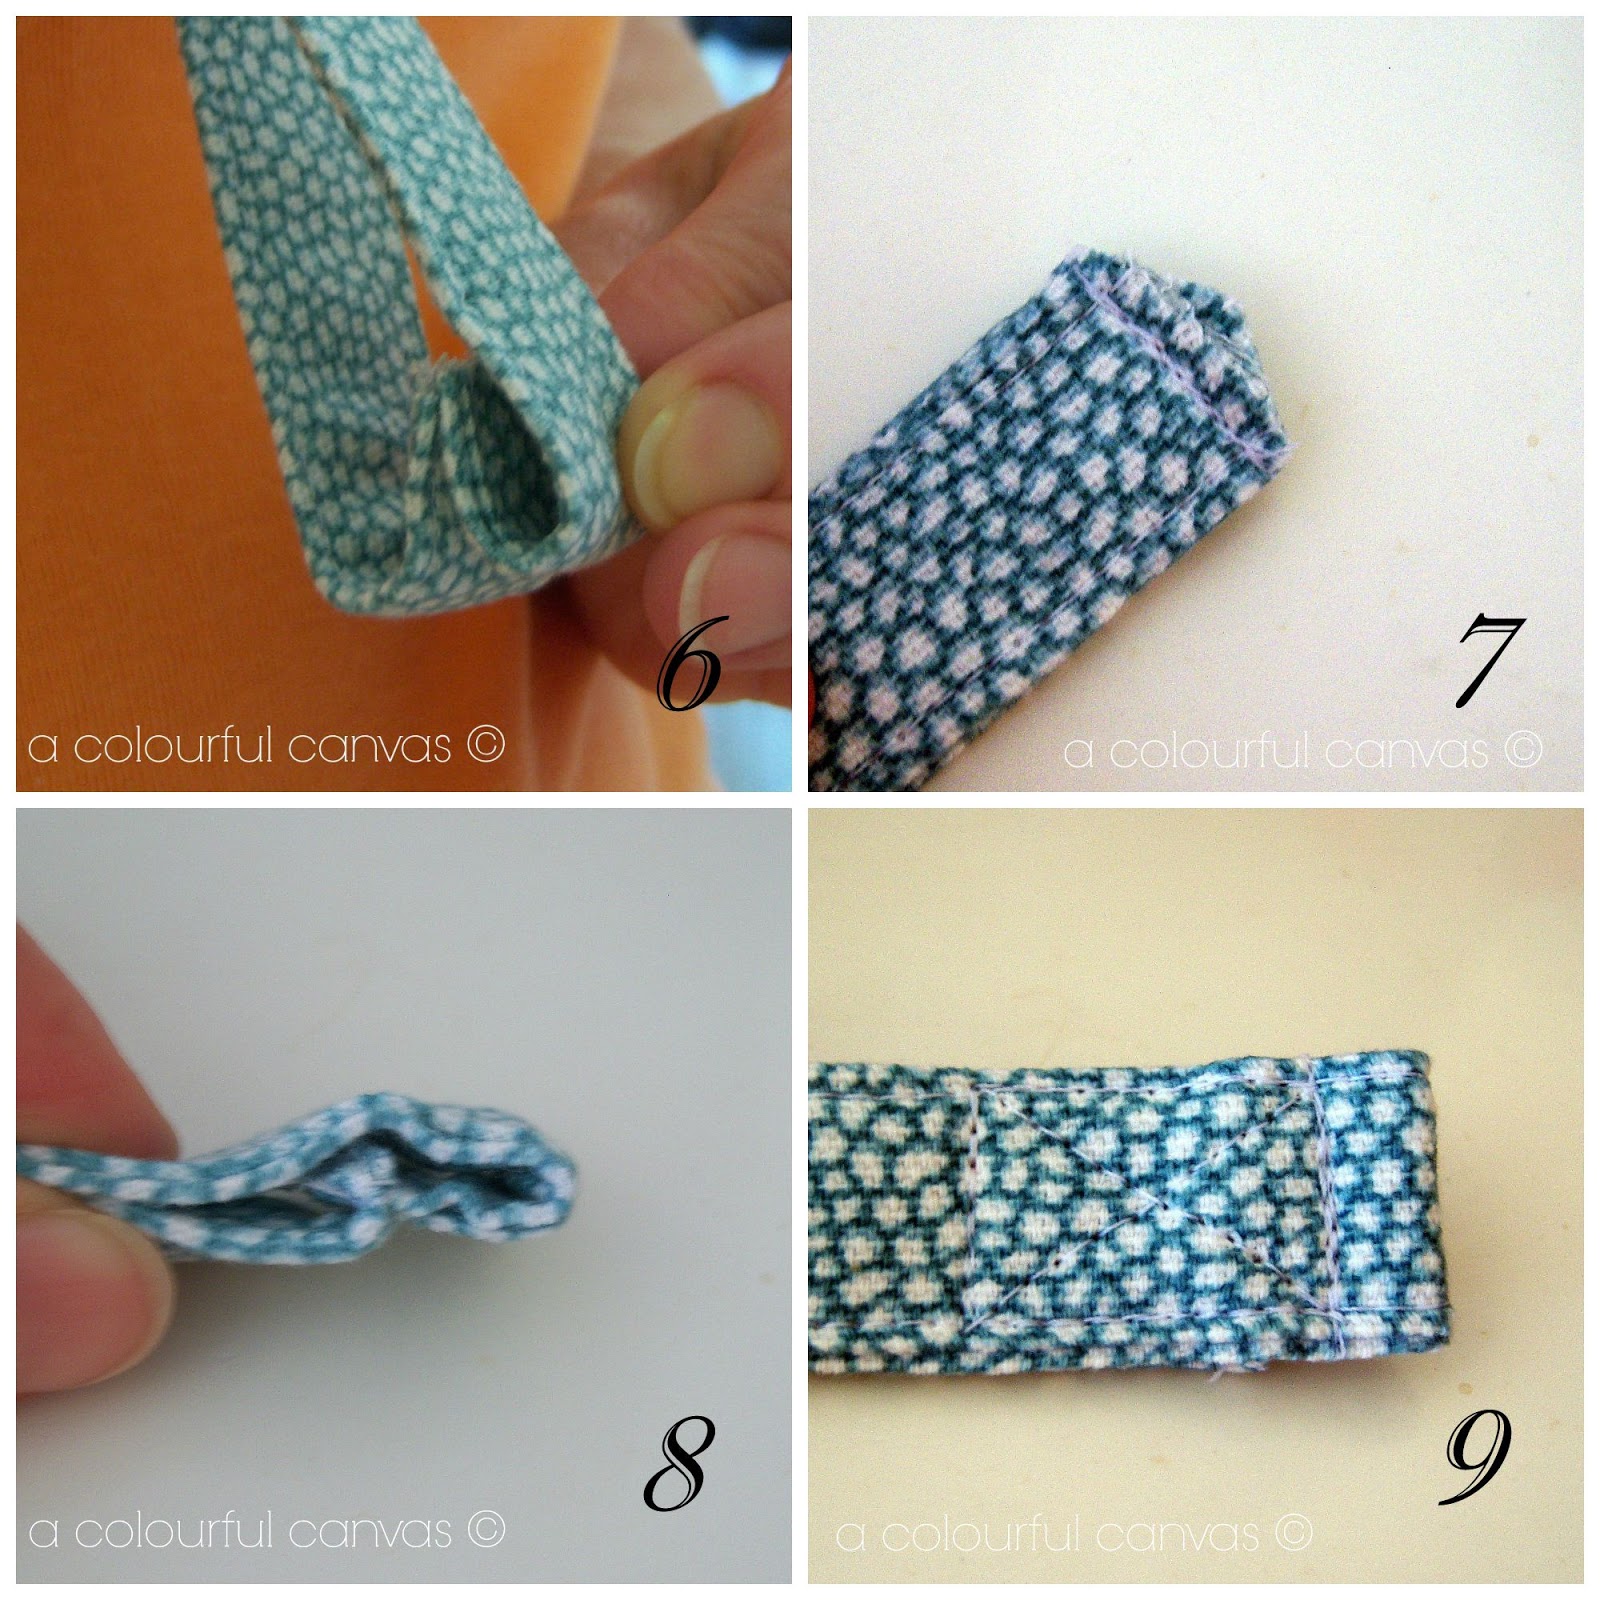

10. Assemble your lanyard! Thread your split key ring through the channel, and optionally add your lanyard hook.
And that’s it! Finito, completo! You can attach a plastic sleeve, or simply add your keys to the ring. I purchased plastic sleeves and lanyard hooks at Walmart and the split key rings at a local dollar store.

Turnip Head Artwork courtesy of the inimitable Melanie of Bag and a Beret. Having a bad head day? You can borrow Turnip Head here
{Slight downside to these soft, comfy lanyards is that they tend to twist a little at the bottom, but they’re still fun!}


50 Comments
So cool sue!! I don't use a lanyard but I know many friends that do and this is an awesome idea to make for them! And such a great way to use up those scraps!
Very nice! I am curious, did you assign the lanyards to specific people or did they pick their own? This puts me in mind of a couple of Christmas' ago when I decided to make a specific style of scarf for just about everyone. Thank heavens for projects that work up quickly!
These are great. You always get my wheels turning.
Sue, I'm not quite sure I got that. Can you do it again? Bwahahaha!! Your lanyards are fanfreakingtastic. At the meetup they looked great, were very practical for names, held the badges Pao gave out, and were great for clipping on the fabric flowers Suzanne made. Plus they are an excellent souvenir. It's what we in the non-biz call an “all-rounder.”
I couldn't quite believe that I admitted to having a scrap stash, but we all do, don't we?
I need to reread this…when I learn how to sew! LOL
I'm sure you can make these in your sleep now. You did such a bang-up professional job. Everyone loved being able to choose their own.
bisous
Suzanne
Great question Flo. We made little loot bags and gave them out at the initial dinner. Suzanne designed the bags and packaging. The outside of each bag was decorated with one of her fabric flowers and Melanie's artwork. Inside were a notepad {Suzanne's design and labour} and mechanical pencil. I added a lanyard to each bag, and Melanie added a bracelet that was created from supplies in her art studio. So…totally random who got which one. I invited people to trade if they coveted another, but everyone seemed happy with their unique selection. As the stuffers of the bags, we chose our lanyards beforehand. Ah, privilege, LOL.
Wheel turning is good, yes?
Wot? We're not in the biz? Huh.
haha…how 'bout if you need another lanyard, let me know.
Your lanyards are very pretty but I am going to be a wet blanket, sorry. You will find lanyards need to have a break point for safety. This is usually a small plastic clip that will separate when under stress so that nothing untoward happens, such as choking when they are accidentally caught on something. Particularly important for children.
I didn't know the English name for these…I don't even know the Spanish name, now that I think of it! But it is a great idea for a little present, and I think that's what my work mates are going to get at the begining of the term. Thank you for the idea and the tutorial…you are the best!!
Love this tutorial, Sue! What a fun project 🙂
-Carley
xx
You tempt me to want to sew, and that's kind of a miracle. These are so cute, and I could probably find all kinds of uses for a pretty lanyard. Now if Melanie will do a drawing tutorial…
What a great idea! Thanks for the tutorial, 'cause I'm going to make several.
I LOVE my lanyard. Thank you so much.
Billy Collins, the American poet, has written a wonderful poem called The Lanyard. It's absolutely worth seeking out and even better if you can hear him read it. I think there's a video on YouTube of his reading the poem.
Vancouver Barbara
Not a wet blanket…I'll make a mention in the post about this, thanks. It's interesting…I have half a dozen ready-made lanyards and not a one has a breakaway point.
I made a bunch of these for my daughter’s rock star bday party a few years ago. The kids had backstage vip passes. I thought about a breakaway thingy after I made them. I couldn’t find them in a hurry so I cut them apart on the back and added Velcro. Worked great and I didn’t have to go out and buy anything extra.
OH, that’s a brilliant solution. Thanks for sharing!
Thanks Merche! What a fun giftie for your colleagues!
Thanks Carley!
I'd be first in line for a Melanie drawing tutorial, but I fear that Melanie's gift can't be taught.
Oooh, several….been there, done that!
I will check this out, thanks Barbara!
I hope things are progressing on your own blog! Hint Hint!
Great tutorial Sue! I am sure that receiving their own personal one of these at the meet up was a hit! And will give them another wonderful memory of that weekend.
Shirl
Thanks Shirl! I think we all enjoyed our little goodie bags!
Those are the prettiest lanyards I've seen! Great tut, I'm pinning it. I actually need to make one. I keep my keys on a lanyard and mine is pretty ratty looking. I never even thought to MAKE one. *slaps forehead*
Your lanyards were so nice it took me awhile to realise that they were handmade! Thanks for my red one, Sue!
Oh my goodness, I had already guessed it, but now that I see the tutorial, I know for sure: THAT WAS A HELL OF A LOT OF WORK. All those lanyards (I had never heard the word before). I keep mine on my desk. It is sitting next to me with the nametag of the meet-up. I will use it as well, but for now I keep it to look at.
Thanks again Sue.
Greetje
Such a great way to use up scraps! Thanks for sharing Sue!
Cool idea! Thanks for the tutorial…I wanted to replace my work lanyard for a while…this is finally pushing me to do it 😉
Great tutorial, thanks! :))))
Ahhhhhhhhhhhhhhh so jealous not to be there, ahhhhhhhhhhhhhhh
Will you come to Spain at all?
XXXXXXXXXXXXXXXXXXXXXX
You lanyards are beautiful and what a sweet and special thing to give to all of the ladies! I am sure they felt special! I love the patterns you chose. I had no idea that they should have a breakaway point. The stuff you learn.
Rebecca
http://www.winnipegstyle.ca
Best lanyards ever (and, being a girlfriend to a rock star, I've experienced many a lanyard)! Mine is the blue ground/white polkadots model up there in the photo. I used it again on my trip to NYC last week. We stayed at a Euro-style hotel with common bathrooms — used the lanyard + badge holder to carry my keycard. SO GLAD you made us these! Thanks again!!!!!
Most music event lanyards don't either. And I'm sure there are lots of musicians that could use break points! Thanks for the intel, Eleanor.
Haha…I do the forehead slap frequently!
Why, you're very welcome Louisa! Hope you're feeling well again and enjoying holiday time.
LOL…you are so worth the effort, although I'm sure you'd rather I had sewn you a haute couture dress. I still can't figure out how Suzanne whipped up all those flower brooches.
LOL…now, I will be keeping even a 3″ wide piece of scrap….sigh…
You're welcome Silvia! I'm betting you will whip up a classy lanyard!
And thank you bunches for taking the time to comment! 🙂
I would LOVE to visit Spain!!!! And absolutely to visit you! Hopefully!!!
'tis true….I still have yet to see a lanyard that has the break points, but I'm sure proper safety lanyards have them. I think I only see the *freebie* types that are handed out at events.
Aw…thanks for your kind words Anne! You are in possession of my Spring For Cotton Dress lanyard, LOL.
Thank you for this tutorial! Super easy to follow. I have a big chest and found 44″ strip to start, ended up 20″ with the ring (19″ without) hit me in the right spot.
[…] Click for more details […]
[…] Fabric Lanyards […]
[…] Click for more details […]
[…] Click for more details […]